2023-02-18 Data Comparison, Buttonwillow #13, Aprilia Tuono V4 Factory, Two Riders
Data is big for me, and as mentioned before, having trusted source reference data is huge. A couple of weeks ago I was at Buttonwillow (config #13) with a trusted source instructor and he took my bike out for a few laps and got to a respectable pace pretty quickly. I've just spent over an hour dissecting a clean lap of his compared to mine. There's about a 9-second differential so it's significant but not unmanageable for me to find a few seconds. This event was also the first time that I was able to run a fairly comprehensive data acquisition setup courtesy of AiM--their Italian and US teams worked to decode the ECU data on the Tuono since the channels changed significantly when Aprilia updated the electronics for the 2021 V4 models.
Because I don't ride Buttonwillow very often, the track isn't burned into my mind quite the same way my more local tracks are (Sonoma, Thunderhill East, Laguna), I don't have the same confidence with some corners and am apprehensive about using as much of the track as I can in blind areas. This will come with more experience at this track, just as it did last year with The Ridge.

Part of my reservation about this is that I want to get closer to theoretical limits than I do presently while minimizing risk (I'm looking for a good value proposition). If I see that my trusted source is still accelerating in an area while initiating turn-in, then I *can* do it. That itself was actually a big question mark for me in a couple of areas (exiting Riverside, Club Corner, etc.). Having the reference data and accompanying video lets me see these things. In this instance, I'm also able to better re-trace my reference rider's exit from Sunset, which has a very significant big bump followed by some smaller bumps. I took the line you would expect exiting, however, I hit the bumps hard enough that the TC kept cutting power so I'd lose my drive out of it. There is one other area where we deviate and that's the entrance to The Sweeper. I've been taught to turn in from the middle of the track whereas my control rider swings quite a ways to the left before turning right. A couple of items I did notice where it will take more time. My control rider demonstrated up to 1.5G in braking force on the way into Sunset with the front end wiggling. My typical maximum braking force, on a hot lap, is closer to 1.15 (this is from a high enough speed where aero plays a role). 1.5G from a high speed braking area means the rear wheel is off the ground for a good bit.
Now I'm never going to be able to execute on all of these items in a single day or weekend, but keeping them in mind and actively picking one or two items a day to work on until the improvement is there gives me a plan. It may take me a good 10 track days there to figure these out but because I have solid reference data, I can build that plan.
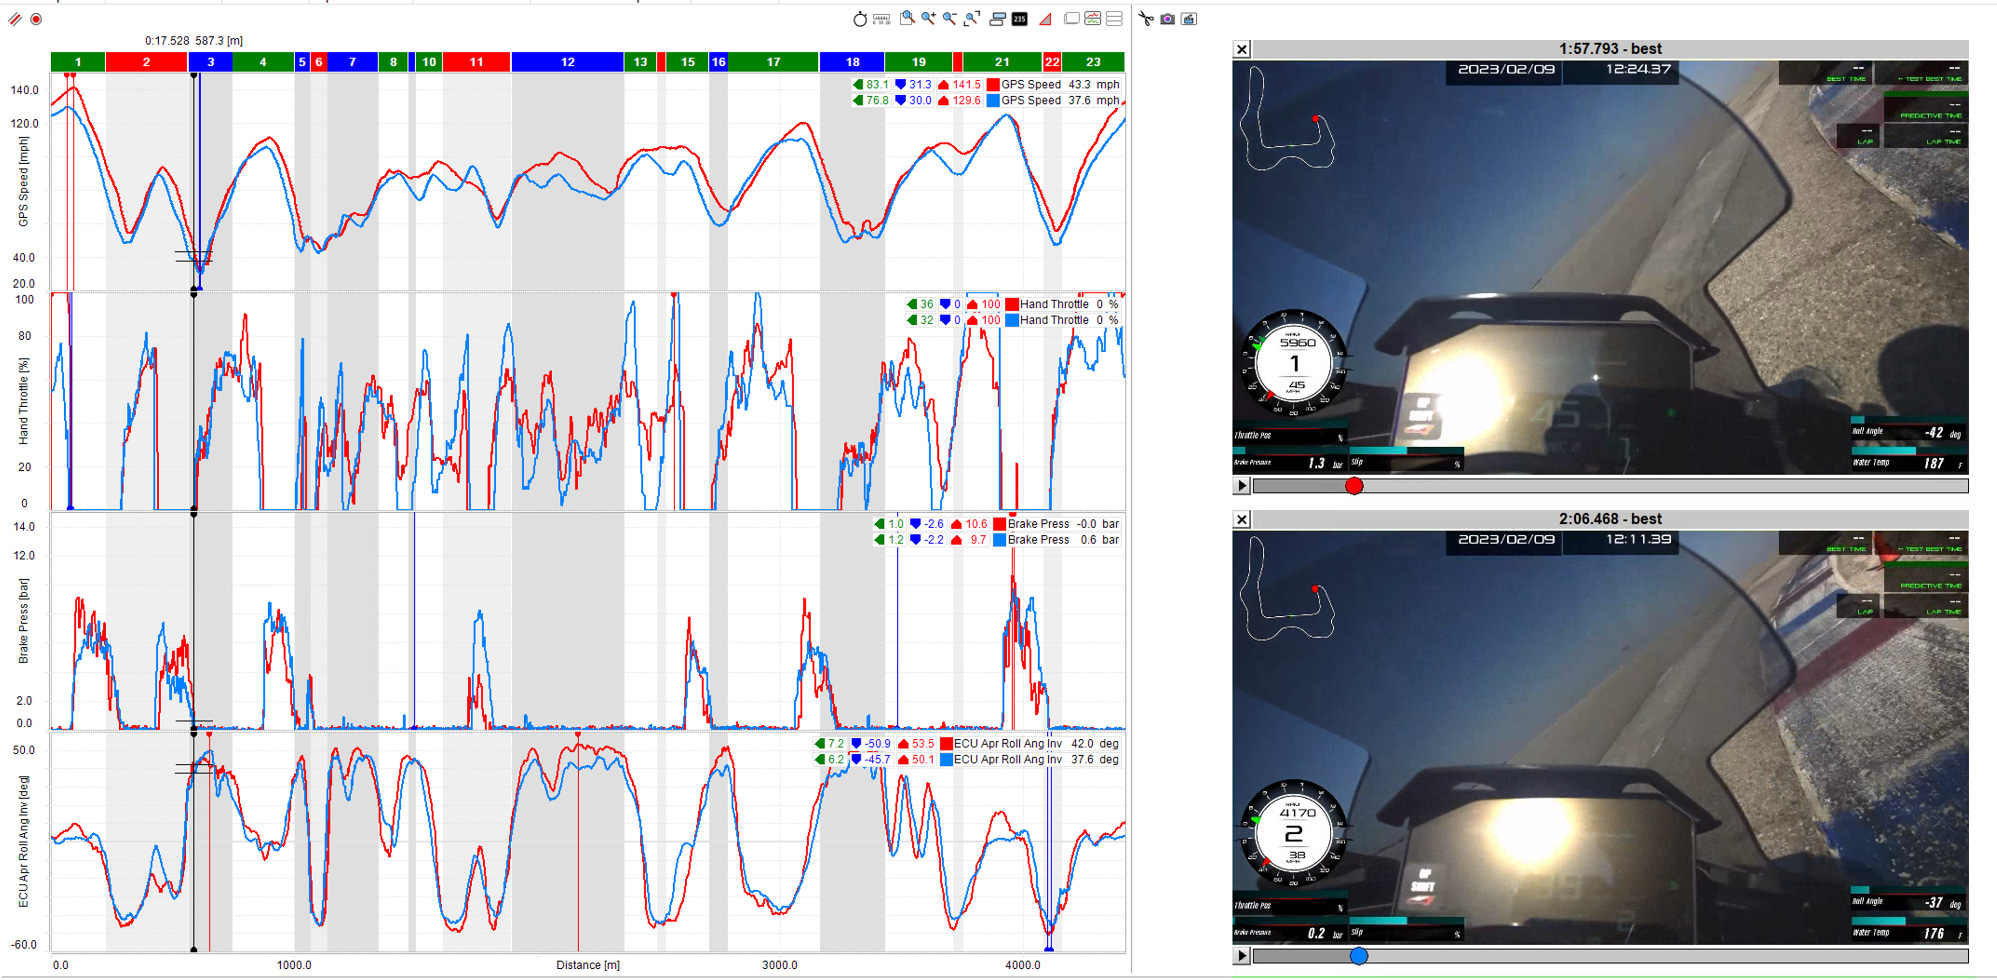
After my detailed analysis, I noted the following specifics for my riding development with this bike at Buttonwillow 13 (at the bottom of this post are screen captures of data + still photos to highlight specifics in further detail):
Front straight to Sunrise - Aron should be WOT & longer more braking, should see about 140mph GPS speed; finished with lighter/longer to get used to the huge horsepower difference on this bike versus the little bikes
Sunrise exit - Aron needs to use more of the track, run to the outside curb, this can be done with more throttle longer
Sunrise to Off Ramp (T2), Reference rider (RR) never stands the bike all the way up because he's used all of the track (above)
Off Ramp (T2), brake release is good but RR carries more speed & lean
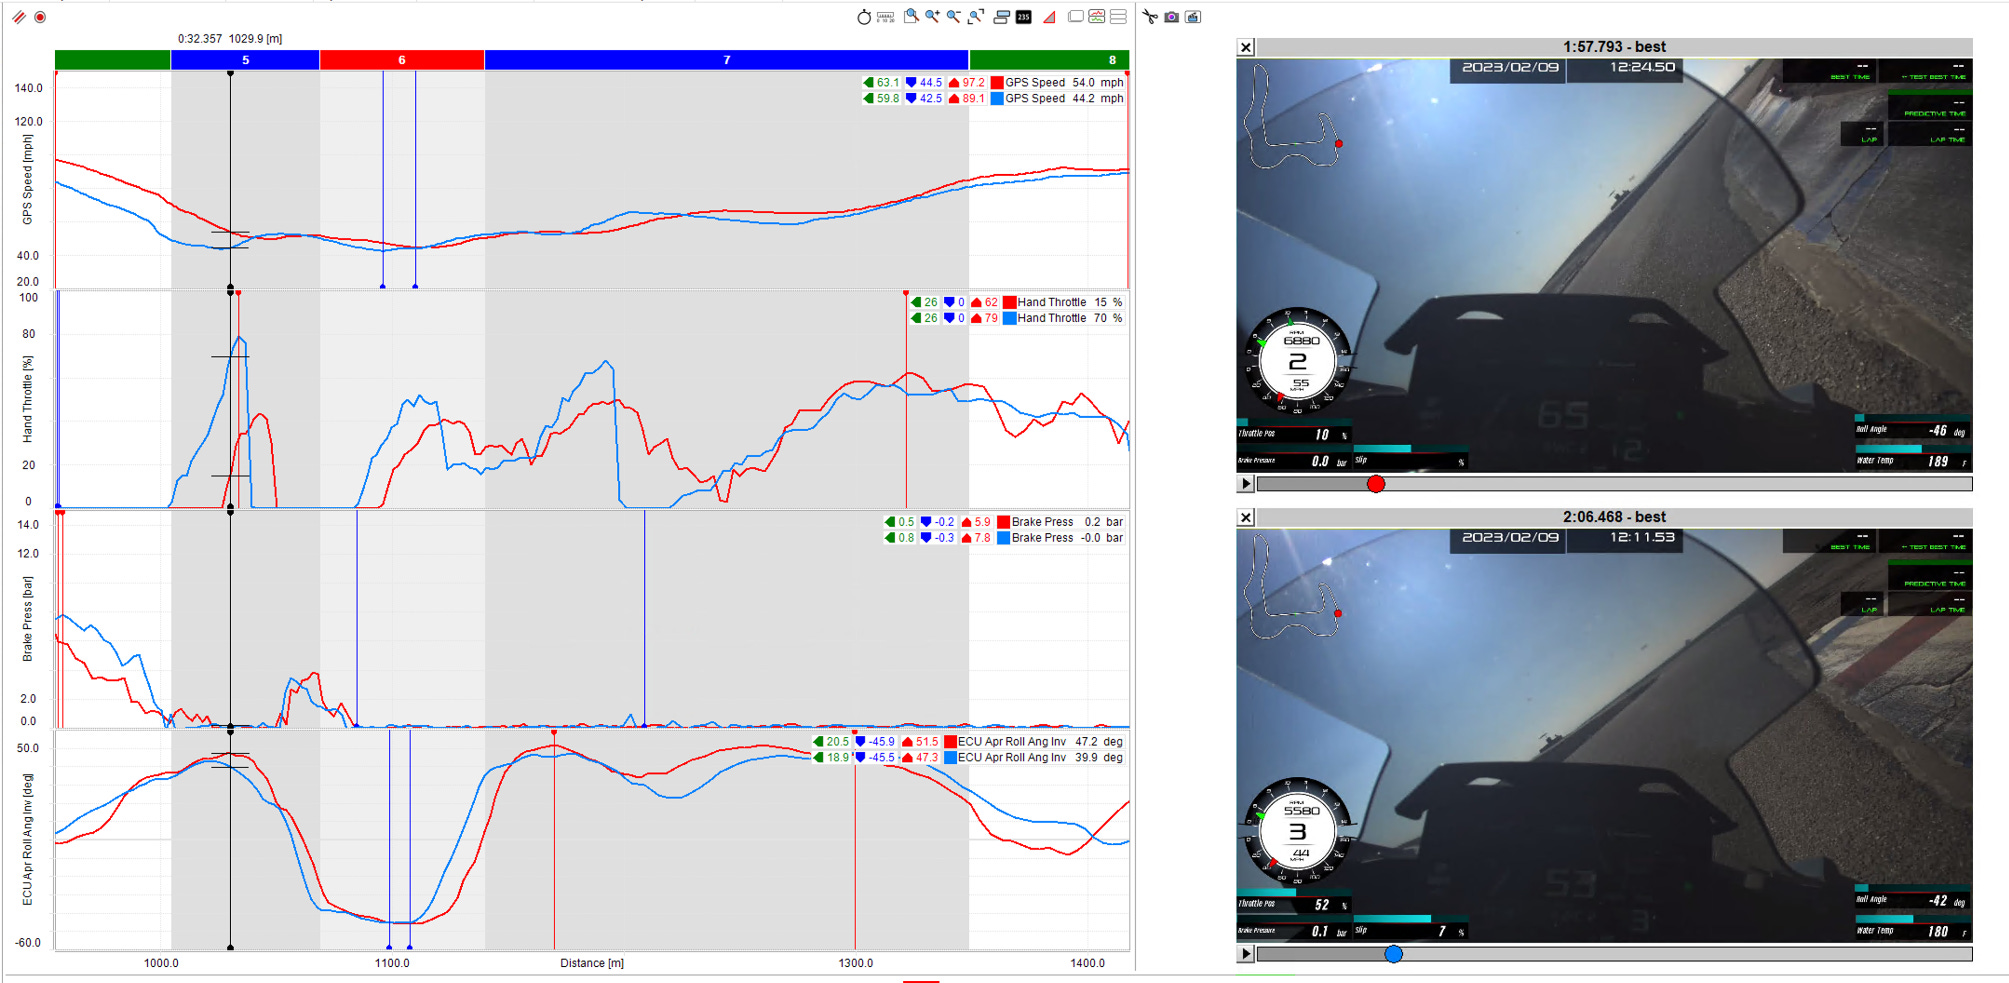
Braking into Cotton Corners, Aron too aggressive with initial braking, brake point and release fine
Cotton Corners left, Aron should adjust apex closer to the end of the right-hand curbing
Grapevine, Aron chops throttle to 0% whereas RR reduces throttle to turn the bike
Exiting Grapevine, RR uses more track sooner while reducing lean angle
Club Corner - RR turns in earlier, never fully cuts throttle, just reduction and is on throttle past the apex; exiting RR only goes 1/2 of the track toward the right, Aron goes further, no need; Aron’s exit is good on the left before the Bus Stop
Bus Stop - Aron’s brake release is late and turns in too early; Aron needs to turn in later and be alongside the right hand curb
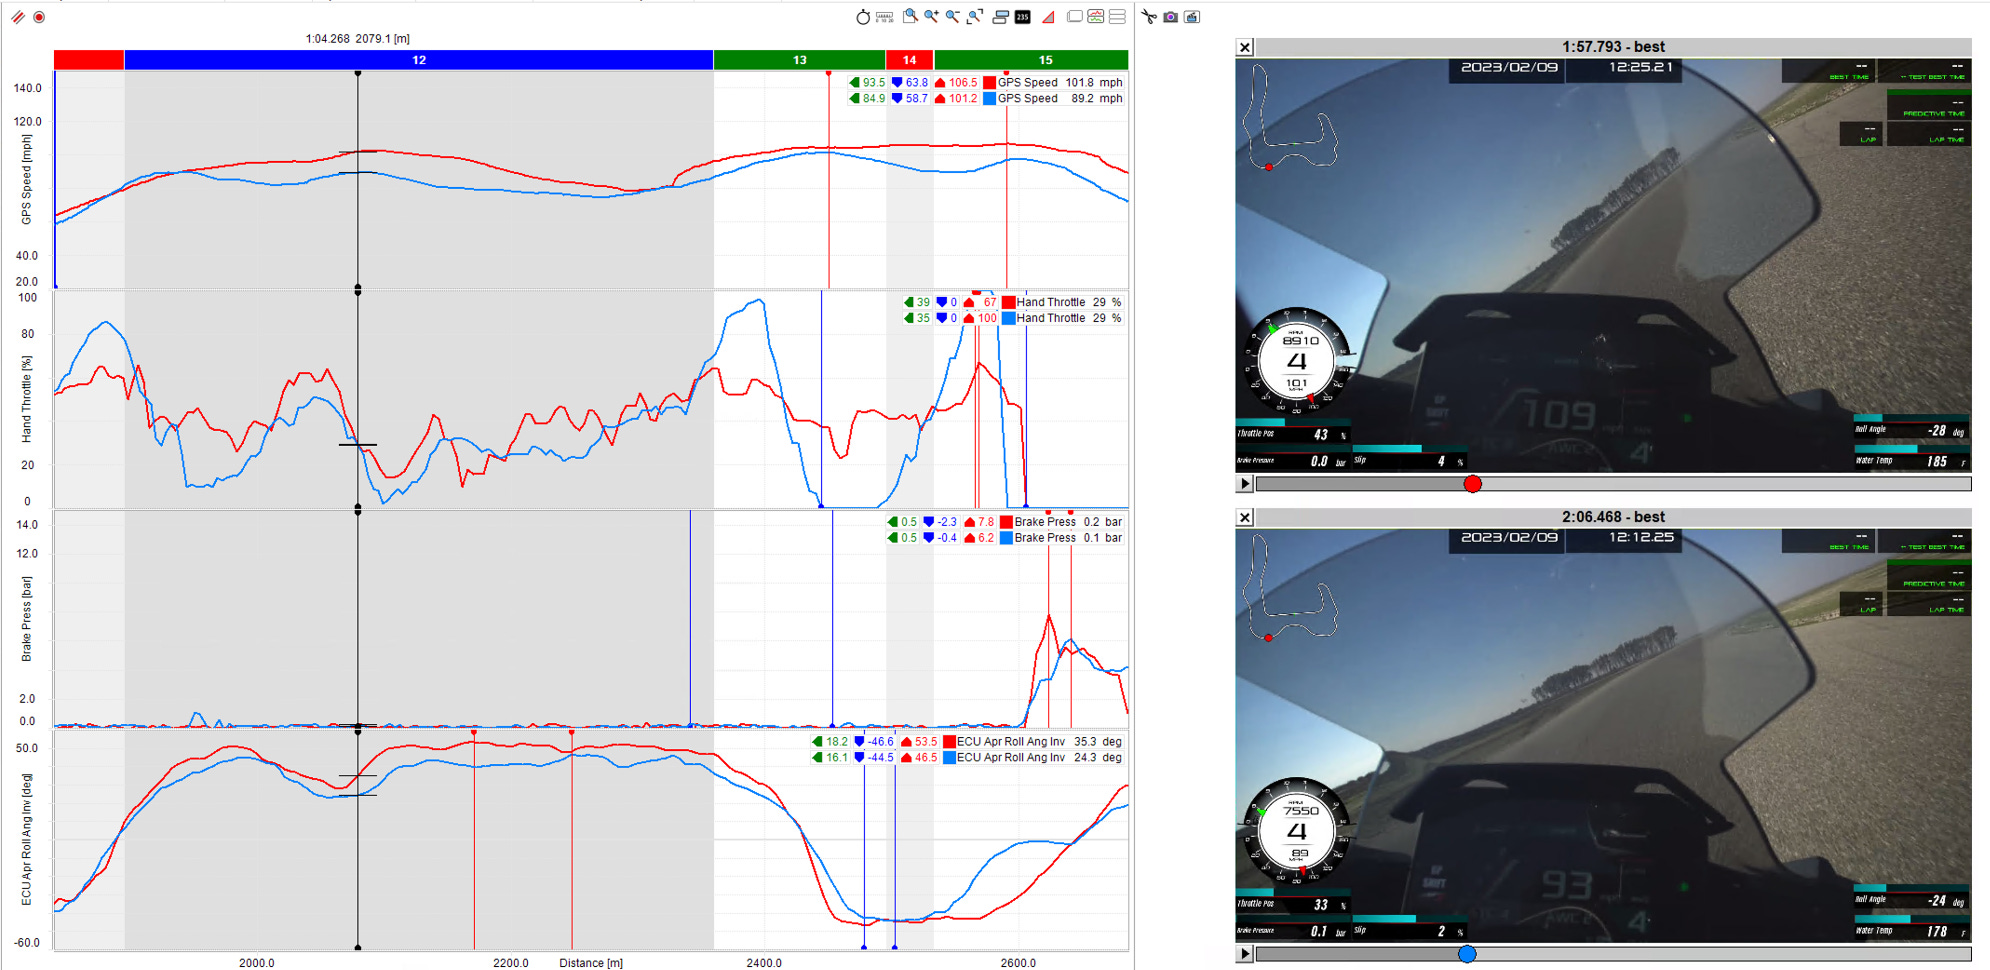
Riverside - RR carries light acceleration all the way until turn-in for apex, Aron is scrubbing speed; exit - RR never chops throttle, turns in on throttle
Phil Hill - Aron uses too much brake for the speed, sheds too much speed; brake timing, shape, and release are okay; Aron needs to be careful to not turn in too early
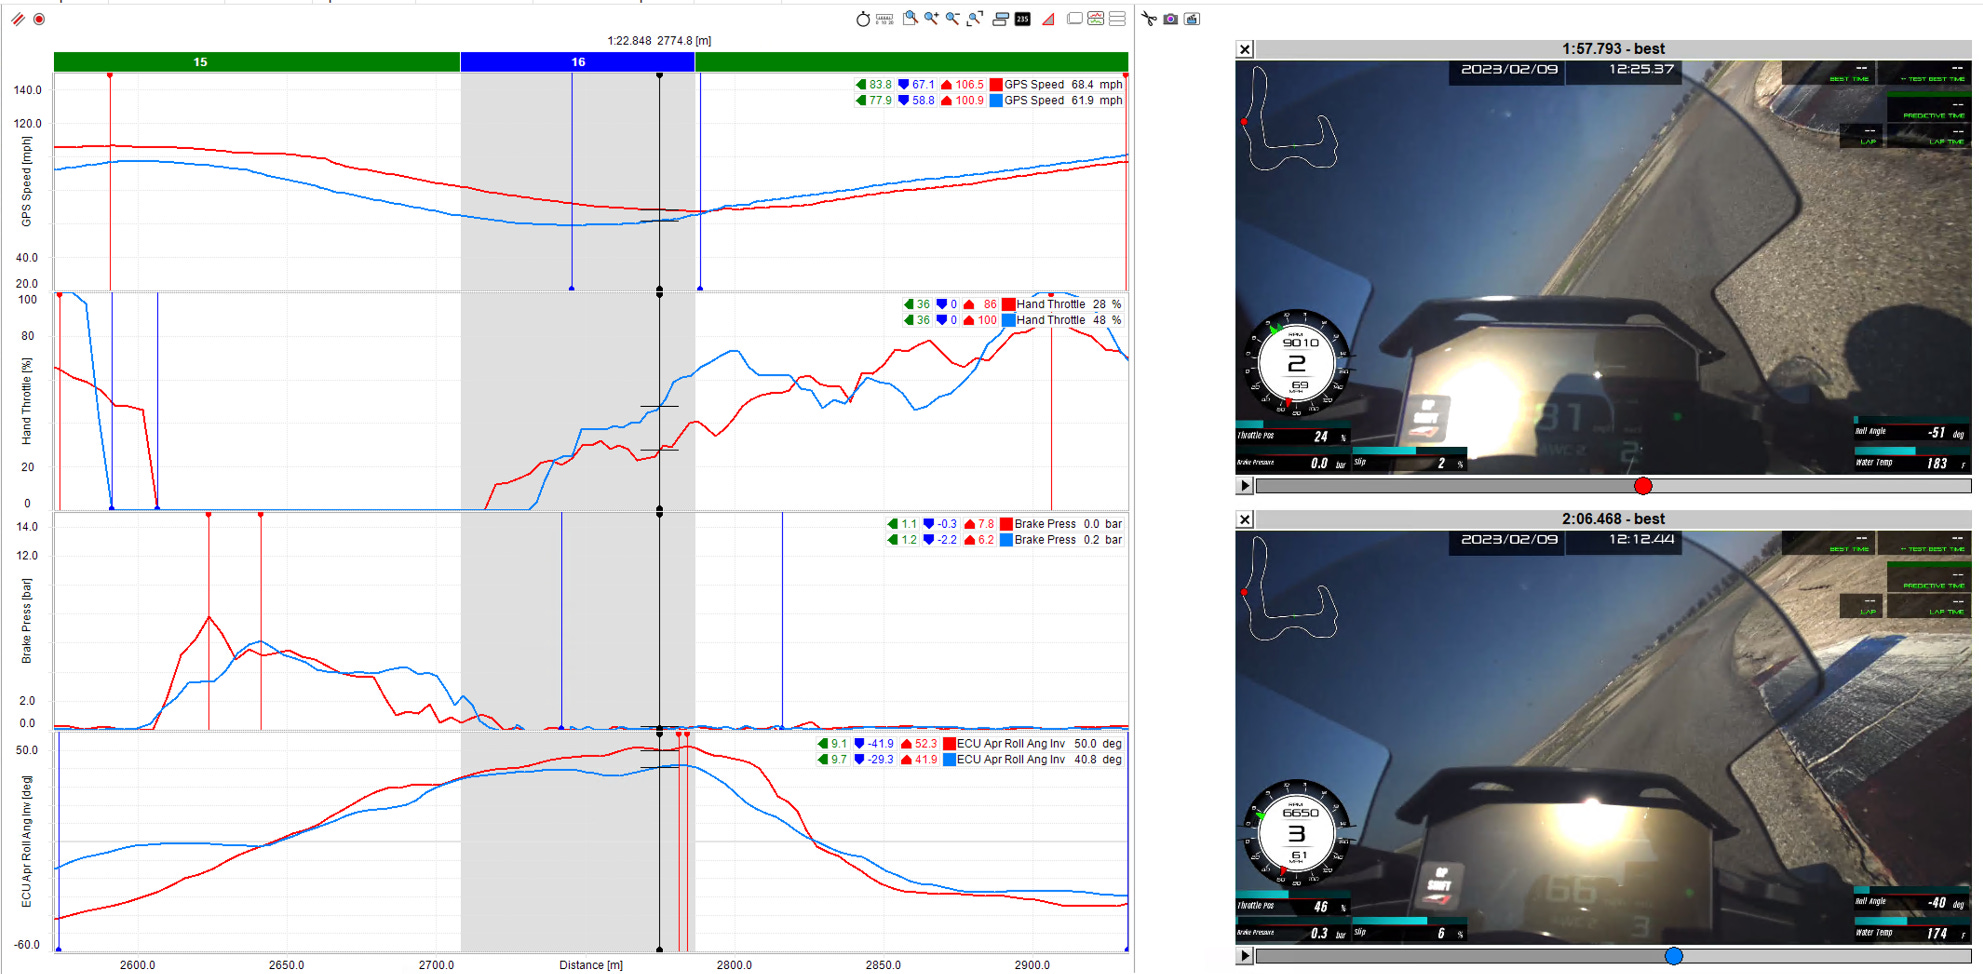
Entrance to The Sweeper - Aron needs to hold throttle just a little longer; RR takes a wider entrance, this is the biggest divergence in lines
Sweeper - Aron carries quite a bit less roll speed and lean angle; try to carry more speed and lean into it, be sure to drift wide whether on throttle or just carrying more speed into it; on the exit, get direction before adding throttle, saw some impatience from Aron
Esses - basically okay but don’t chop the throttle for the last left entirely, minimize reduced throttle time; exit is good
Sunset - entrance, brake initiation point is fine, Aron goes to too much brake, reduces, and returns to big brake pressure
Sunset Exit - the bump is an issue for Aron, he had trouble navigating the least bumpy path; RR gets the bike outside very early after the apex, well before the end of the right-hand curbing, Aron follows the expected line; before apexing, be thinking about getting to the outside as soon as possible
Since I'm going with revised gearing (old gearing was stock 15/42t or 2.80 overall, new gearing will be 15/44t 2.93 overall), I've mapped out my tentative gear selection in advance, just so I have one less thing to think about and can hopefully hit the ground running.
T1 (Sunrise) - G2
T2 (Off Ramp)- G2, short shift to G3 on exit
T3 (Cotton Corners) - G2/G3? Definitely G3 short shift for...
T4 (Grapevine) - G3
T5 (Club Corner) - G3/G4 - might short shift to G4?
T6 (Bus Stop) - G3, short shift to G4 before Truck Stop
T7 (Truck Stop) - G4
T8 (Riverside) - G4, maybe G5?
T9 (Phil Hill) - G3, G4 on exit
T10 (Sweeper) - G3
T11 (Esses) - G4 short shift
T12 (Sunset) - G3, exit to G4
Details on the bike and data setup:
2022 Aprilia Tuono V4 Factory (TV4F)
AiM Solo 2 DL (S2DL) + AiM SmartyCam 3 Sport with custom AiM ECU profile, mounted to the handlebar with RAM ball mounts
OE Aprilia RSV4 Factory forged aluminum wheels, stock 15/42 gearing with 520 chain conversion, OEM Pirelli Supercorsa SP v3 in 120/70 Front, 200/55 Rear, no warmers, cold pressure of 31 psi front, 23 psi rear
Akrapovic carbon fiber slip-on with mid-pipe and Gabro tune
Brembo RCS 17 Corsa Corta master cylinder (I really like this master cylinder and the lever, the stock one was fine)

In the following graphics, when discussing speed, I'm referring to GPS speed, not what's on the bike's dash. Motorcycle speedometers are notoriously inaccurate due to manufacturing and tire circumference when leaned over. If you look at some of the dash speeds versus GPS speeds you will see up to around 15mph variances. Slip is the speed differential the bike's ECU measures between front and rear wheels, higher positive slip numbers will trigger TC/WC, higher negative numbers may trigger ABS. Hand throttle position is indicated, as well as GPS speed, gear selection, and RPM. Roll angle is lean angle with positive and negative numbers and reported by the bike's internal IMU. Unfortunately the lap time infographics weren't configured correctly that day and I had fixed it for day 2 but that ended up being littered with red flags so I never got a clean session. In the still shots of the video, reference rider is top right, I am bottom right.
I don't have a ton of experience at Buttonwillow but I did review several laps of my own and this was the fairly consistent execution I saw on my faster laps (even if it wasn't the fastest) so I feel it is representative of what I did that day.